
Setting up a ControlByWeb Wi-Fi device requires a little bit of networking knowledge. These steps will help you complete this process in a few short minutes.
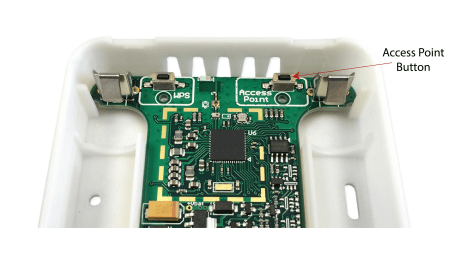
1. First, put the unit into Access Point mode by pressing and holding the Access Point button for a few seconds. On the XW-110/111/112 units, this button is behind the front cover. You can remove this cover carefully with a small flathead screwdriver. The Access Point button for the WebRelay Wireless is on the faceplate between the green terminal blocks.
2. Your ControlByWeb Wi-Fi module is now creating its own Wi-Fi access point. Using a Wi-Fi computing device such as a laptop, tablet, or smartphone, scan for and connect to the module’s Wi-Fi network. Its name will depend on the model number and the last 6 digits of the serial number. For example, it could be called “XW110-03FF6A”.
3. Once you’re connected, access the setup pages by visiting the default IP address in your favorite web browser:
a. http://192.168.1.2/setup.html
b. Username: admin
c. Password: webrelay
4. Once logged in, navigate to the Wi-Fi Networks tab and select your Wi-Fi network from the dropdown. Select the security type for your Wi-Fi network and enter the password, if needed.
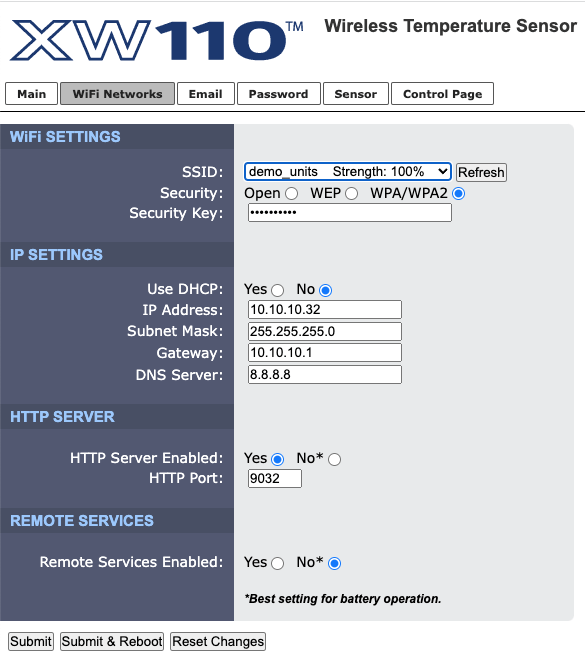
5. Assign a new static IP address. You’ll get this IP address from your network administrator. You can also use DHCP mode if you’re familiar with how DHCP works, however we don’t typically recommend it.
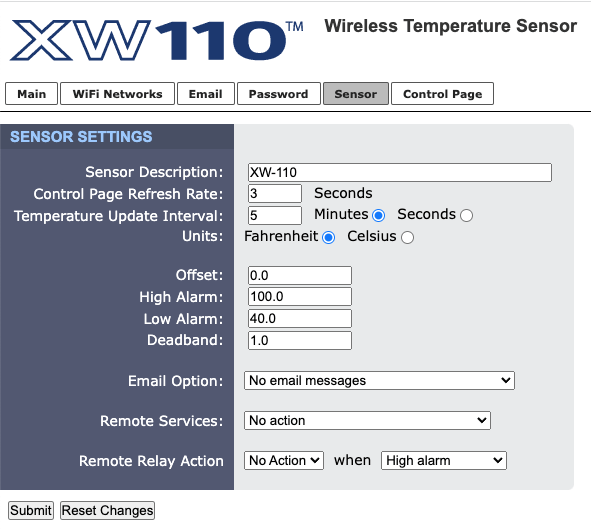
6. XW-110 Plus only: If you’re adding a temperature sensor, navigate to the Sensor tab. Your sensor address will appear in the Sensor Address dropdown field. Adjust the sensors settings as needed.
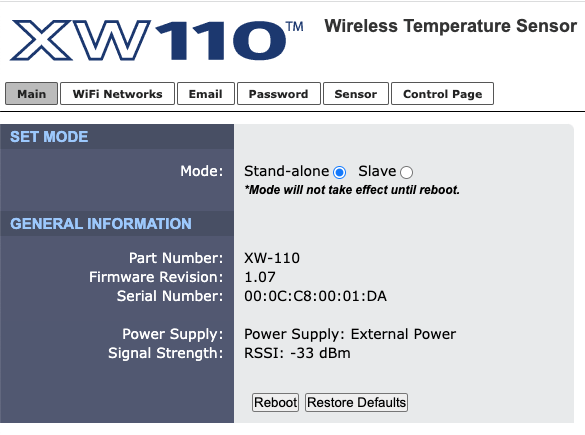
7. Reboot the ControlByWeb Wi-Fi unit by navigating to the Main tab and selecting the Reboot button near the bottom of the page.
8. The unit will now reboot and automatically connect to your Wi-Fi network. Access it by visiting the IP address that you assigned earlier, or refer to your DHCP server for the address assigned to the unit.
9. You may now finish adjusting the settings of your ControlByWeb Wi-Fi device such as resetting the password and adding your SMTP email settings.
If you follow these directions and still have questions, contact us.